
Sealing wax has made a remarkable comeback from its historical roots to become a favorite among modern crafters, wedding planners, and stationery enthusiasts. Whether you’re looking to add elegance to your wedding invitations or create personalized gifts, understanding sealing wax opens up a world of creative possibilities.
This comprehensive guide covers everything from the basics of wax types to advanced techniques, helping you master the art of wax sealing. You’ll discover the tools you need, step-by-step instructions for perfect seals, and creative applications that go far beyond traditional letter sealing.
From choosing your first custom wax seal stamp to troubleshooting common issues, we’ll walk you through every aspect of this timeless craft. By the end of this guide, you’ll have the knowledge & confidence to create stunning wax seals for any occasion.
A Brief History of Sealing Wax
Ancient civilizations first used sealing wax as a security measure for important documents & correspondence. The Egyptians, Greeks, and Romans all employed various forms of wax & clay to authenticate messages and protect their contents from tampering.
During the Middle Ages, sealing wax became a symbol of authority and authenticity. Nobles and clergy used elaborate custom seal stamps to mark their correspondence, with each design serving as a unique signature that was nearly impossible to forge.
The practice evolved through the Renaissance and into the modern era, adapting to new materials & techniques while maintaining its core appeal. Today, sealing wax experiences renewed popularity as people seek tangible, personal touches in our digital age.
Modern applications extend far beyond official documents. Crafters, artists, and event planners now use sealing wax to add sophistication to invitations, packaging, and decorative projects.
Types of Sealing Wax
Understanding different wax types helps you choose the right material for your specific needs and applications.
Traditional Wax
Traditional sealing wax contains shellac, rosin, and pigments. This classic formula creates hard, brittle seals that crack if bent or flexed. Traditional wax works best for decorative applications where the sealed item won’t be handled frequently.
The authentic appearance and deep colors make traditional wax ideal for formal invitations, certificates, and display pieces. However, postal services may damage traditional wax seals during processing.
Flexible Wax
Flexible wax formulations include synthetic polymers that allow the seal to bend without cracking. This modern innovation makes flexible wax perfect for mailed items, as it survives postal handling much better than traditional alternatives.
Flexible wax maintains the visual appeal of traditional wax while offering practical durability. Most contemporary sealing wax projects benefit from flexible formulations, especially wedding invitations and business correspondence.
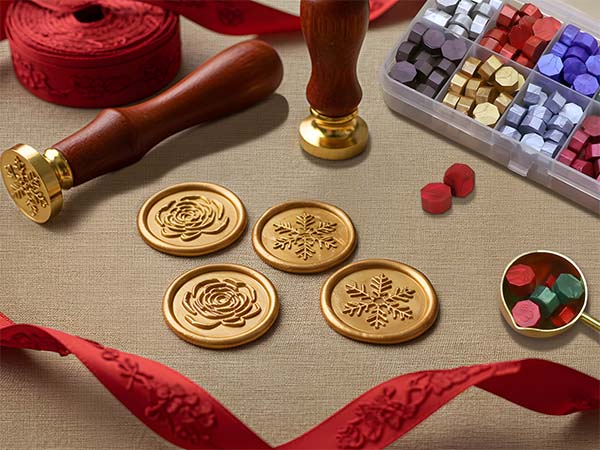
Wax Beads
Wax beads offer convenience and portion control. Each bead contains enough wax for one seal, eliminating waste and guesswork. Simply place a bead in a melting spoon, heat until liquid, and apply.
The uniform size of beads ensures consistent seal appearance across multiple projects. Many crafters prefer beads for large projects like wedding invitations where consistency matters most.
Wax Sticks
Traditional wax sticks require holding over a flame while dripping melted wax onto the surface. This method offers more control over wax quantity but requires practice to achieve consistent results.
Wax sticks work well for experienced users who enjoy the traditional sealing process. However, beginners often find sticks more challenging than beads or flexible alternatives.
Glue Gun Wax
Glue gun wax sticks fit standard hot glue guns, making wax application quick and easy. This method provides excellent temperature control and steady wax flow, perfect for large projects.
The convenience of glue gun application makes this option popular for bulk projects. However, ensure your glue gun reaches appropriate temperatures for proper wax melting.
Essential Tools and Materials
Success with sealing wax depends on having the right tools and understanding how to use them properly.
Wax Seal Stamps
Your custom wax seal stamp serves as the centerpiece of every project. Brass stamps offer durability and heat resistance, making them ideal for frequent use. Proper brass stamp care includes cleaning after each use and storing in a dry location.
Consider stamp size based on your intended applications. Larger stamps create impressive seals for certificates and formal documents, while smaller stamps work better for everyday correspondence and craft projects.
Melting Equipment
Melting spoons provide traditional wax preparation methods. Hold the spoon over a candle or lighter, add wax, and wait for complete melting. This method offers excellent control but requires steady hands.
Electric melting pots maintain consistent temperatures and work well for large projects. These devices eliminate the need for open flames and provide steady heat for extended working sessions.
Tea light warmers offer a middle ground between spoons and electric pots. Place a small metal container over the tea light, add wax, and enjoy controlled melting without electricity.
Release Agents and Accessories
Release agents prevent wax from sticking to your stamp. Many crafters use a light coating of olive oil or commercial release sprays. Apply sparingly to avoid affecting the final seal appearance.
Silicone mats protect work surfaces and make cleanup easier. The non-stick surface prevents wax from bonding to your workspace while providing a stable platform for sealing.
Tweezers help position small elements like dried flowers or glitter in fresh wax. Choose tweezers with fine points for precise placement of delicate materials.
Step-by-Step Guide to Perfect Wax Seals
Creating professional-quality wax seals requires attention to detail and proper technique.
Preparing Your Workspace
Set up your workspace with adequate lighting and ventilation. Arrange all tools within easy reach to avoid interruptions during the sealing process. Cover your work surface with a silicone mat or parchment paper.
Ensure your personalized wax seal is clean and ready for use. Apply a light coating of release agent if desired, but avoid over-application that might affect seal clarity.
Melting the Wax
For wax beads, place one bead in your melting spoon and hold over a flame. Heat until the wax becomes completely liquid, stirring gently with a toothpick if needed. Avoid overheating, which can cause bubbling or discoloration.
With wax sticks, hold the stick at a 45-degree angle over the target area. Allow melted wax to drip steadily, rotating the stick to ensure even melting. Work quickly to maintain proper wax temperature.
Applying the Wax
Pour the melted wax in a steady, controlled motion to create a circular pool. The wax should flow smoothly without creating air bubbles. Aim for a consistent thickness across the entire seal area.
Allow the wax to settle for 2-3 seconds before stamping. The surface should appear slightly glossy but not liquid enough to splash when pressed.
Impressing the Seal
Press your custom seal stamp straight down into the wax with firm, even pressure. Avoid rocking or twisting the stamp, which can create unclear impressions. Hold steady pressure for 8-10 seconds to ensure complete impression transfer.
The wax should feel firm but not completely hard when you lift the stamp. If the wax sticks to the stamp, it may still be too warm. Allow additional cooling time for future seals.
Cooling and Finishing
Allow the seal to cool completely before handling, typically 2-3 minutes depending on ambient temperature. Properly cooled seals should feel hard to the touch and show no flexibility when gently pressed.
Inspect each seal for clarity and completeness. Well-executed seals show sharp detail throughout the design without air bubbles or incomplete impressions.
Troubleshooting Common Issues
Cracked seals often result from wax cooling too quickly or being too brittle. Use flexible wax formulations for items that will be handled frequently. Allow gradual cooling rather than forced cooling with fans or cold surfaces.
Incomplete impressions suggest insufficient pressure or premature stamp removal. Press firmly and maintain pressure until the wax begins to set. Clean your stamp between uses to ensure sharp detail transfer.
Bubbled seals indicate overheated wax or moisture contamination. Heat wax gradually and ensure all surfaces are completely dry before application. Store wax in a dry location to prevent moisture absorption.
Creative Uses for Sealing Wax
Modern applications for sealing wax extend far beyond traditional correspondence, offering endless opportunities for creative expression.
Wedding Invitations and Stationery
Wedding invitations showcase sealing wax at its most elegant. Custom wax seal stamps featuring monograms, wedding dates, or meaningful symbols create lasting impressions on guests. Coordinate wax colors with wedding themes for cohesive presentation.
Consider using wedding embossers alongside wax seals for layered elegance. The combination of embossed & sealed elements creates sophisticated invitation suites that guests will treasure.
Save-the-date cards benefit from smaller seals that hint at the formal invitation to follow. Use consistent design elements across all wedding stationery for professional appearance.
Gift Wrapping and Packaging
Transform ordinary gift wrapping with custom wax seals. Apply seals directly to wrapping paper, ribbon intersections, or gift tags for personalized finishing touches. Recipients often save beautifully sealed packages as keepsakes.
Business packaging gains perceived value through professional sealing. Custom seal stamps featuring company logos create memorable unboxing experiences that customers associate with quality and attention to detail.
Seasonal gift wrapping benefits from themed seals. Create custom designs for holidays, birthdays, or special occasions to make every gift feel specially crafted.
Craft Projects and DIY Decorations
Scrapbooking incorporates wax seals as dimensional elements that add texture and visual interest. Apply seals to photo corners, journaling blocks, or as standalone decorative elements.
Handmade cards feature seals as focal points or accent details. The three-dimensional quality of wax seals creates tactile appeal that recipients appreciate in our increasingly digital world.
Art projects benefit from wax seal incorporation. Mixed media pieces, shadow boxes, and decorative displays all gain sophistication through strategic seal placement.
Advanced Techniques and Tips
Master crafters employ sophisticated techniques to create truly unique sealing wax applications.
Multi-Colored Wax Effects
Layer different colored waxes while still warm to create marbled effects. Drop small amounts of contrasting colors into the base wax and swirl gently with a toothpick before stamping.
Ombre effects require careful color blending. Start with the lightest shade, add progressively darker colors while the wax remains workable, and blend edges for smooth transitions.
Metallic accents enhance traditional colored wax. Add gold or silver leaf to fresh seals, or dust with metallic powders before the wax fully hardens.
Embellishment Integration
Dried flowers pressed into fresh wax create botanical seals perfect for nature-themed projects. Choose flat flowers and herbs that won’t interfere with stamp impression clarity.
Glitter incorporation requires timing precision. Sprinkle fine glitter onto the wax surface immediately after stamping, while the wax remains slightly tacky. Excess glitter brushes away once the seal hardens.
Small gemstones or pearls pressed into seal centers create jewelry-like effects. Ensure embellishments are heat-resistant and won’t interfere with the overall seal integrity.
Custom Wax Blending
Create unique colors by melting different wax shades together. Start with small quantities to test color combinations before committing to large batches. Document successful formulas for future reference.
Scent integration adds another sensory dimension. Add a few drops of essential oil to melted wax for subtle fragrance. Avoid oils that might affect wax hardening properties.
Texture variations come from adding fine materials like sand, coffee grounds, or crushed herbs to melted wax. These additions create interesting surface textures while maintaining stamp impression clarity.
Where to Buy Quality Sealing Wax and Supplies
Finding reliable suppliers ensures consistent results and project success.
Choosing the Right Supplier
Sealloom offers comprehensive sealing wax supplies with worldwide free shipping and a 10% discount code at checkout. Their product range includes traditional and flexible waxes, custom wax seal stamps, and all necessary accessories.
Quality suppliers provide detailed product descriptions, material specifications, and customer support. Look for companies offering customization options for stamps and color matching services for specific project needs.
Consider suppliers who offer starter kits for beginners. These packages typically include wax, basic tools, and instructions to help newcomers learn proper techniques.
Essential Supply Checklist
Stock multiple wax colors for project variety. Earth tones work well for rustic themes, while jewel tones suit formal applications. Metallic waxes add luxury appeal to special projects.
Maintain backup melting equipment. Having spare spoons or melting pots prevents project delays when tools need cleaning or replacement.
Keep release agents and cleaning supplies readily available. Proper maintenance extends tool life and ensures consistent seal quality across all projects.
Caring for Your Wax Seal Stamps
Proper stamp care ensures long-lasting performance and clear impressions for years of use.
Cleaning Procedures
Clean stamps immediately after use while any residual wax remains warm and pliable. Use a soft brush or cloth to remove wax buildup from design details. Avoid harsh solvents that might damage stamp surfaces.
For stubborn wax residue, warm the stamp gently with a hair dryer and wipe with a soft cloth. Never use sharp tools that might scratch or damage the stamp surface.
Store clean stamps in a dry location away from extreme temperatures. Individual pouches or compartmentalized storage boxes prevent damage and make organization easier.
Preventing Damage
Uncoated brass stamps require gentle handling to maintain surface detail. Avoid dropping or striking stamps against hard surfaces, which can cause dents or chips in the design.
Apply release agents sparingly to prevent buildup that might clog fine design details. Regular cleaning prevents accumulation that affects impression quality.
Rotate between multiple stamps for large projects to prevent overheating any single stamp. Allow stamps to cool between uses for optimal performance.
Long-term Storage
Climate-controlled storage prevents brass tarnishing and other material degradation. Avoid storing stamps in damp basements or hot attics where temperature and humidity fluctuations occur.
Document stamp designs and sizes for easy identification. Photography or rubbings help identify specific stamps when you have large collections.
Consider professional restoration for valuable or antique stamps showing wear. Specialized services can refresh stamp surfaces and restore clear impression capability.
The Art of Embossing vs. Sealing
Understanding the differences between embossing and sealing helps you choose the right technique for each project.
Embossing Fundamentals
Wedding embossers create raised impressions without color or material addition. The dimensional effect comes from paper deformation rather than applied substances. This technique works well for subtle, elegant effects.
Embossing offers permanence that wax sealing cannot match. The impressed design becomes part of the paper structure, making it virtually impossible to remove or alter.
Dry embossing works on various paper weights and textures. Unlike wax sealing, embossing doesn’t require additional materials or drying time, making it efficient for large projects.
Sealing Advantages
Wax sealing provides color and texture variations impossible with embossing alone. The three-dimensional quality creates visual and tactile appeal that photographs beautifully for social media sharing.
Security applications favor wax sealing because tampering becomes immediately obvious. Broken or disturbed seals clearly indicate unauthorized access attempts.
Artistic expression flourishes with sealing wax through color mixing, embellishment addition, and creative application techniques. The material properties of wax allow for artistic effects embossing cannot achieve.
Combining Techniques
Layered applications use both embossing and sealing for maximum impact. Emboss first to create a base impression, then apply a coordinating wax seal nearby for complementary effects.
Wedding invitations particularly benefit from combined techniques. Use wedding embossers for return addresses & wax seals for envelope closures to create cohesive, luxurious presentation.
Business applications can incorporate company embossing for professional appearance while using colored wax seals for special promotions or premium client correspondence.
Conclusion: Embrace the Timeless Art of Sealing Wax
Sealing wax offers a perfect blend of historical tradition and contemporary creativity. From simple monogram seals to elaborate multi-colored creations, this versatile medium lets you add personal touches that digital communications simply cannot match.
The techniques & knowledge covered in this guide provide the foundation for endless creative exploration. Whether you’re planning a wedding, starting a craft business, or simply want to add elegance to your correspondence, sealing wax delivers results that impress and inspire.
Start with basic supplies and simple projects to build your skills and confidence. As your expertise grows, experiment with advanced techniques and custom applications that reflect your personal style and project needs.
Ready to begin your sealing wax journey? Contact our team at support@sealloom.com for personalized recommendations on custom wax seal stamps, custom rubber stamps, or custom book embossers that bring your creative vision to life.


Leave a comment